My mom used to make these (actually, she still does), and I absolutely love them. They're great plain, or in a salad, or for whatever else you want to use them for! Pickled beets are so simple to make - please, don't buy them pre-made! However, you can start with canned beets in whatever shape you like (whole, sliced, cubed, chunked, etc). If they're big chunks or slices, I prefer them cold; if however, they're cubed, I like them hot.
This recipe easily doubles...triples...multiplies however many times you want to make it.
2 cans beets, drained - reserve the juice (I used whole beets & cut them into chunks)
1 cup sugar
1 cup white vinegar
1 cup beet juice (from canned beets)
Combine sugar, vinegar, and beet juice and bring to a boil over medium heat. After it reaches a full boil, remove from the heat, cool slightly, and pour over the beets. You'll probably have some juice left over, but not enough for a third can of beets. (This works best if you put them into a canning jar & use a wide-mouth funnel.) Two cans of beets (not sliced) will fill up a quart jar. Either keep them in the fridge, or process them according to home-canning directions.

Friday, February 16, 2007
Tuesday, February 13, 2007
Long Time, No See
My apologies to anyone who's been checking this site for new recipes; I've been sick, and the last thing on my mind was the computer and my blog! No cooking/baking for me lately - I've just been munching on peanut butter & bananas on Saltine crackers with a glass of milk. However, I'm doing much better, and hopefully I'll be able to start cooking/baking again soon. I received some samples from another Pam's Pantry (she's in Michigan), so, again, hopefully I'll be posting my thoughts on some of her mixes soon.
Meanwhile, Happy Valentine's Day! Make some Pink Stuff to share with your sweetheart(s)!
Meanwhile, Happy Valentine's Day! Make some Pink Stuff to share with your sweetheart(s)!
Thursday, January 25, 2007
Apple Pound Cake
Hey folks. I haven't been cooking/baking much lately, hence, the lack of posting. However, I thought I'd share another recipe from my grandmother. She made this for Christmas, and, if I'd skipped Christmas lunch, I'd have consumed the entire cake by myself. It's that good. Obviously I'm biased, but this cake is scrumptious, and the almost crunchy exterior provides a nice contrast to the chewy interior. Yum.
1 1/2 c. oil
2 c. sugar
3 eggs
2 tsp. vanilla
3 c. all-purpose flour
1 tsp. baking soda
1 tsp. salt
1/2 tsp. cinnamon
1/2 tsp. grated nutmeg
2 c. finely chopped peeled apples
1 c. chopped nuts
1/2 c. golden raisins
Apple Cider Glaze (recipe follows)
Preheat oven to 325F.
Beat oil, sugar, eggs, and vanilla until well blended. Combine dry ingredients and add to the sugar mixture, beating well. Spoon into a greased and floured 10-inch tube pan (she used a square tube pan). Bake for about 1 hour or until the cake tests done. Let it cool 10 minutes before removing from the pan. Prick the top with a fork and drizzle on the glaze.
Apple Cider Glaze
1/2 c. apple juice
1.2 c. brown sugar
1/4 stick butter (2 Tbsp.)
Boil the ingredients together until the sugar is dissolved. (She also notes that you could add 1/3 c. Apple Jack if desired, but she doesn't add it.)
Thursday, January 18, 2007
Blueberry Maple Breakfast Bake
I found this recipe on Simply Recipes a while back, and I finally got the chance to try it. I had to adjust it slightly since I didn't have a 9x9 pan. I thought it was rather tasty (and leftovers make a good quick breakfast before dashing off to work), especially when drizzled with more maple syrup. Elise presents great recipes and photos (almost daily!), so be sure to check out her blog: Simply Recipes.
Blueberry Maple Breakfast Bake (slightly adapted)
3/4 loaf of white bread (I used Sara Lee White Wheat)
4 oz reduced-fat cream cheese
2 cups fresh or frozen blueberries, divided
6 eggs, beaten
1 cups milk
1/4 cup maple syrup
1/4 cup melted butter
Preheat oven to 350 degrees F.
Remove crusts from bread; cut into one inch cubes. Cut cream cheese in small cubes (makes about 1 cup). Grease a 8x8x2 inch baking dish. Place half of the bread cubes in the dish. Scatter cream cheese cubes and 1 cup of blueberries over the bread. Top with remaining bread cubes and blueberries. In a bowl, combine eggs, milk, maple syrup and butter. Carefully pour over bread mixture. Bake until a knife inserted in the center comes out clean, about 1 hour, covering with aluminum foil if eges brown too much. To serve, cut into squares. Accompany with additional maple syrup, if desired. Can be prepared the night before, and just baked before serving.
Friday, January 12, 2007
Chateau Morrisette
Chateau Morrisette is one of Virginia's largest wineries, and it is located just off the Blue Ridge Parkway (Milepost 171.5). My husband and I stopped at the winery on our honeymoon. When we go to visit my family, we pass within 5 miles of this hidden gem. For those who know me well, the last thing you'd expect me to support would be a winery. However, don't worry! I'm not here to promote their wine. I'm here to recommend that everyone try their vinegars!


Thursday, January 11, 2007
Blogging By Mail
I finally received my BBM package in the mail yesterday! Aarika from Aarikavination enclosed a letter explaining her rather extensive run of back luck before/during the holidays. Things finally calmed down enough for her to get my package in the mail this week. Hopefully things will calm down even more for Aarika soon!
But, you're interested in the package contents, aren't you? Well, tada! All sorts of goodies!

Starting from the top left, moving clockwise: Double Apple Muffin Mix, from Aarika's local farmer's market; Milk N Honees (Milk Honey Filled Drops); Honey Pear Tea; Raspberry Ginger Tea. Next is a a mix CD entitled "Calmness: December Megamix"; after her eventful holiday season, I'm sure she could use a little calmness in her life! The CD is resting on a big bag of (homemade) White Chocolate Peppermint Pretzel Sticks. She said the JELLO Cheesecake Pudding intrigued her when she saw it in the grocery store, and I'm glad she sent it. It's really good with some frozen fruit when you're in a hurry to make a tasty dessert. In front are an Amish Country Postcard and an "Aspens" postcard by Ansel Adams - Excellent choice! I love Ansel Adams' work, and "Aspens" is one of my favorite scenes from his collection. Finally, we have candy canes, (in the middle) Candy Cane Hershey Kisses, and the cute tea towel everything is resting on! Since I don't like milk or dark chocolate, she definitely gave me a reason to smile with all the white chocolate. The Candy Cane Kisses are really yummy; it's hard not to eat the whole bag at once!
 I can hardly wait to try the muffin mix; this Saturday morning's breakfast will be the perfect opportunity to do so. The Milk N Honees are wonderful! They remind me of a candy I used to eat when I was growing up. (Wow, was that really 18 years ago?!) I haven't tasted the tea yet, but it certainly smells great. I'll have to have some with my Double Apple Muffins!

Isn't this cute?! Aarika lamented about the tea towel being slightly out of season, but I don't mind a bit. And, like she said, we can all use another tea towel, right? I know I certainly can.

Here's one more cute item from the package, though it was on the outside. Aarika decorated the outside of the package with festive stickers, and I thought these guys were just adorable.
Thank you so much, Aarika, for the package! And, thanks also to Stephanie of Dispensing Happiness for heading up this BBM effort!
But, you're interested in the package contents, aren't you? Well, tada! All sorts of goodies!

Starting from the top left, moving clockwise: Double Apple Muffin Mix, from Aarika's local farmer's market; Milk N Honees (Milk Honey Filled Drops); Honey Pear Tea; Raspberry Ginger Tea. Next is a a mix CD entitled "Calmness: December Megamix"; after her eventful holiday season, I'm sure she could use a little calmness in her life! The CD is resting on a big bag of (homemade) White Chocolate Peppermint Pretzel Sticks. She said the JELLO Cheesecake Pudding intrigued her when she saw it in the grocery store, and I'm glad she sent it. It's really good with some frozen fruit when you're in a hurry to make a tasty dessert. In front are an Amish Country Postcard and an "Aspens" postcard by Ansel Adams - Excellent choice! I love Ansel Adams' work, and "Aspens" is one of my favorite scenes from his collection. Finally, we have candy canes, (in the middle) Candy Cane Hershey Kisses, and the cute tea towel everything is resting on! Since I don't like milk or dark chocolate, she definitely gave me a reason to smile with all the white chocolate. The Candy Cane Kisses are really yummy; it's hard not to eat the whole bag at once!
 I can hardly wait to try the muffin mix; this Saturday morning's breakfast will be the perfect opportunity to do so. The Milk N Honees are wonderful! They remind me of a candy I used to eat when I was growing up. (Wow, was that really 18 years ago?!) I haven't tasted the tea yet, but it certainly smells great. I'll have to have some with my Double Apple Muffins!
Isn't this cute?! Aarika lamented about the tea towel being slightly out of season, but I don't mind a bit. And, like she said, we can all use another tea towel, right? I know I certainly can.

Here's one more cute item from the package, though it was on the outside. Aarika decorated the outside of the package with festive stickers, and I thought these guys were just adorable.
Thank you so much, Aarika, for the package! And, thanks also to Stephanie of Dispensing Happiness for heading up this BBM effort!
Wednesday, January 10, 2007
Comments
I was beginnning to wonder why no one had commented on any of my posts. And, I knew people were visiting this blog. So, what gives? My stupidity, of course. I had comment moderation enabled, but I didn't know there were any comments to moderate. So, I apologize (especially to Brilynn from Jumbo Empanadas). The few comments that have been left are now visible.
Tuesday, January 09, 2007
Apple Cabbage Raisin Salad
I'm glad to be back from a rather long hiatus! (I tried to update earlier, but Blogger decided that I didn't need to update my blog.) I hope you had a great holiday with your family and friends. Ours was busy, but it was great to see everyone again.
While I was gone, my BBM partner finally received her package from me. [Again, I'm sorry for the delay, but at least you received it before Christmas!] Lisa from La Mia Cucina posted about the package here. I'm so glad that she really liked all the goodies I sent; it's so much fun to gather everything and wait to see/read the recipient's reaction! No word yet on the BBM package I'm supposed to receive; hopefully my BBM partner isn't having too much bad luck these days...especially over the holidays.
Speaking of holidays, I'll share a recipe from my grandmother that she prepared for Christmas lunch: Apple Cabbage Raisin Salad. I haven't actually made it yet, but it's scrumptious. Trust me. I'm sure you could substitute low-fat yogurt for the mayo, but I'd drain it really well to get the right consistency before adding it to the other ingredients. This recipe serves 4, but it can easily be doubled as needed. I'd recommend preparing this dish the day before you'll serve it.
1 red apple, chopped (do not peel)
2 cups shredded cabbage
1/2 cup raisins
1/2 cup sliced almonds
1/3 cup light mayonnaise (or more if needed - just add to taste)
Toss the chopped apples together with the cabbage, raisins, and almonds in a bowl. Stir in mayo and mix well. Store in the refrigerator; serve chilled.
Wednesday, December 20, 2006
Peanut Butter and Chocolate Bundt Cake
In celebration of some friends' anniversary, I made this cake while babysitting for them at their house. So far, they don't seem to mind being guinea pigs for my baking adventures. They have reported that this cake was good, so I'll take their word for it. (I trust their tastebuds!) I added some chocolate ganache to the cake, which made for a rather nice presentation.
This recipe hails from Culinary in theDesert Country, which he adapted from Canadian Living. It seems to be quite a keeper. I forgot my camera, so no pictures to share yet; however, Joe has a good photo on his blog so you can see what it looks like.
For the filling:
2/3 cup peanut butter
1/3 cup cream cheese, softened
1 tablespoon butter, softened
3 egg yolks
1 teaspoon vanilla
1/3 cup granulated sugar
2 tablespoons all-purpose flour
For the cake batter:
1 3/4 cups all-purpose flour
1/2 teaspoons baking soda
1/2 teaspoons salt
12 tablespoons natural cocoa powder
3/4 cup boiling water
3 ounces quality bittersweet chocolate, chopped
12 tablespoons sour cream
12 tablespoons butter, softened
1 2/3 cups packed brown sugar
2 eggs
2 teaspoons vanilla
Preheat oven to 350F.
To make the filling:
In a large mixing bowl, beat peanut butter, cream cheese and butter until combined. Add egg yolks, one at a time, and beat until combined. Mix in vanilla. Be sure to scrape down the sides. Pour in sugar and flour, mix until combined. Fit a pastry bag with a large plain tip and scoop the filling into the bag. (I didn't use a tip on the pastry bag, and it worked just fine.) Place in the refrigerator until ready to use.
To make the batter:
In a medium bowl, whisk together flour, baking soda and salt.
In a medium metal or glass bowl, add cocoa and whisk in boiling water. Add in chopped chocolate and whisk until smooth. Mix in sour cream.
In large mixing bowl, cream together butter and sugar until light and fluffy. Mix in eggs, one at a time, and then beat in vanilla. Alternatively mix in the dry ingredients and the cocoa mixture, beginning and ending with the flour. Mix just until combined with each addition.
Spray a bundt pan with a nonstick spray that has flour included (like Baker's Joy or Pam with Flour). Spoon a little less than half of the batter into bottom of the bundt pan. Using the pastry bag that has the peanut butter mixture, carefully pipe a ring of the filling over the center of the chocolate batter. Pour the remaining batter on top and gently tap the pan to remove air bubbles.
Bake until top springs back when lightly touched or a toothpick comes out mostly clean with a few crumbs attached - about 50-60 minutes. Remove from the oven and set on a wire rack to cool for 5 minutes. Place a wire cooling rack on top of the cake and carefully turn over - remove the pan and let cool completely.
This recipe hails from Culinary in the
For the filling:
2/3 cup peanut butter
1/3 cup cream cheese, softened
1 tablespoon butter, softened
3 egg yolks
1 teaspoon vanilla
1/3 cup granulated sugar
2 tablespoons all-purpose flour
For the cake batter:
1 3/4 cups all-purpose flour
1/2 teaspoons baking soda
1/2 teaspoons salt
12 tablespoons natural cocoa powder
3/4 cup boiling water
3 ounces quality bittersweet chocolate, chopped
12 tablespoons sour cream
12 tablespoons butter, softened
1 2/3 cups packed brown sugar
2 eggs
2 teaspoons vanilla
Preheat oven to 350F.
To make the filling:
In a large mixing bowl, beat peanut butter, cream cheese and butter until combined. Add egg yolks, one at a time, and beat until combined. Mix in vanilla. Be sure to scrape down the sides. Pour in sugar and flour, mix until combined. Fit a pastry bag with a large plain tip and scoop the filling into the bag. (I didn't use a tip on the pastry bag, and it worked just fine.) Place in the refrigerator until ready to use.
To make the batter:
In a medium bowl, whisk together flour, baking soda and salt.
In a medium metal or glass bowl, add cocoa and whisk in boiling water. Add in chopped chocolate and whisk until smooth. Mix in sour cream.
In large mixing bowl, cream together butter and sugar until light and fluffy. Mix in eggs, one at a time, and then beat in vanilla. Alternatively mix in the dry ingredients and the cocoa mixture, beginning and ending with the flour. Mix just until combined with each addition.
Spray a bundt pan with a nonstick spray that has flour included (like Baker's Joy or Pam with Flour). Spoon a little less than half of the batter into bottom of the bundt pan. Using the pastry bag that has the peanut butter mixture, carefully pipe a ring of the filling over the center of the chocolate batter. Pour the remaining batter on top and gently tap the pan to remove air bubbles.
Bake until top springs back when lightly touched or a toothpick comes out mostly clean with a few crumbs attached - about 50-60 minutes. Remove from the oven and set on a wire rack to cool for 5 minutes. Place a wire cooling rack on top of the cake and carefully turn over - remove the pan and let cool completely.
Friday, December 15, 2006
Chocolate Espresso Snowcaps
I said previously that the holidays make me feel all "Martha Stewarty"; to prove my point, here's one of the goodies I'm giving as gifts this year. And, yes, it's a Martha recipe (slightly adapted). It's pretty simple and easy to double (or triple) the recipe, but it's also somewhat time consuming since you have to roll them out & in sugar twice. These cookies received my husband's nod of approval, so they pass the "share-able" test. Plus, I think they look neat, too. *One warning: your hands will get very chocolatey.
1/2 cup all-purpose flour
1/4 cup unsweetened cocoa powder
4 teaspoons instant coffee (or espresso powder)
1 teaspoon baking powder
1/8 teaspoon salt
4 tablespoons unsalted butter, room temperature
2/3 cup packed light-brown sugar
1 large egg
4 ounces bittersweet or semisweet chocolate, melted and cooled (I used semisweet chocolate chips)
1 tablespoon milk
confectioners sugar, for coating
Preheat oven to 350F and prepare baking sheets with parchment or a Silpat. (Do this while your hands are still clean!)
In a medium bowl, whisk together flour, cocoa, coffee (or espresso), baking powder, and salt. In a stand mixer (the dough will fairly stiff), beat butter and brown sugar until light and fluffy. Beat in egg until well combined; mix in cooled chocolate. With mixer on low speed, gradually add dry ingredients; beat in milk just until combined. Flatten dough into a disk; wrap in plastic. Freeze until firm, about 45 minutes.
Place confectioners’ sugar into a medium bowl; working in batches, roll balls in sugar twice. Place balls on prepared baking sheets, 2 inches apart. Bake, rotating sheets halfway through, until cookies have spread and coating is cracked, 12 to 14 minutes; cookies will still be soft to the touch. Transfer to a wire rack to cool completely.
I'm Back!
My apologies to those who kept checking this blog over the past week to find no updates whatsoever. I wasn't trying to be a slacker; on the contrary, I've been a very, very busy girl. I completed my final 3 courses and will graduate tomorrow (finally!) with dual graduate degrees. Oh, and I've been trying to get up my Christmas decorations, clean the house, and, yes, do some baking. Okay, I've been doing lots of baking, so much that I didn't stop to take pictures. (We're talking non-stop, all day long yesterday!) So, I'm back, at least for a week. I'll be out of town during Christmas, but I'll try to post some of the recipes of the goodies I'm giving as Christmas gifts. In case I don't get back here before Dec. 25, I'll wish you a Merry Christmas! I hope you celebrate with lots of family, friends, and good food!
Wednesday, November 29, 2006
Semi-Sabbatical
Since I have 5 major projects to complete before Dec. 12 (not including all the holiday stuff I have to do), I will likely not be posting until the 12th.
Then, it's an all-out baking frenzy.
Oh, and now that I have my Blogging By Mail swap partner, I have to get my BBM package ready, too.
I love this time of year. Makes me feel all Martha-Stewarty. :)
Then, it's an all-out baking frenzy.
Oh, and now that I have my Blogging By Mail swap partner, I have to get my BBM package ready, too.
I love this time of year. Makes me feel all Martha-Stewarty. :)
Monday, November 20, 2006
Vanilla Caramel Popcorn
Since popcorn is one of my favorite snacks, and I like trying out new recipes, this weekend included a rendezvous with my oven to make this recipe from bakingsheet. Serendipitously, I, too, had a measuring mishap during the process, though mine was due to misreading rather than being startled. I used 2 Tablespoons instead of 2 teaspoons of molasses. (I scooped some out and added a bit of corn syrup back to get the ratio somewhat correct.) I also added some nuts to the mix. We found the extra molasses and nuts to be wonderful. I would have had a picture to share, but unfortunately, the popcorn was devoured too quickly. So, without further adieu, here's my modified version of Vanilla Caramel Popcorn.
8-10 cups popcorn, un- or lightly-salted (I used air popped)
1 cup almonds, chopped (medium pieces, about 1/4 inch)
1 cup light brown sugar
1/2 cup light corn syrup
4 tsp molasses (original recipe calls for 2 tsp)
1 Tbsp. butter
1/2 tsp salt
1/2 tsp baking soda
1 Tbsp. vanilla
Pop the corn and let cool. Line a 10x15 pan with lightly greased foil or a Silpat. Preheat oven to 250F. Place glass bowl in oven to warm while making the caramel.
In a medium saucepan, combine sugar, corn syrup, molasses and butter; bring to a boil over medium heat. Cook until the mixture reaches 250F and is at hard-ball stage (use a candy thermometer). This will take 2 to 3 minutes.
In the meantime, transfer popcorn and nuts to the now-warm glass bowl.
Remove pan from the heat and immediately stir in salt, baking soda, and vanilla. (Warning, the mixture will foam!) Pour the mixture over the popcorn and nuts, stirring until most of the kernels are coated. Pour mixture onto baking sheet.
Bake for 1 hour, stirring (and if necessary, spreading out) every 15-20 minutes.
Let cool and break into pieces. Store in an airtight container.
Thursday, November 16, 2006
Chocolate Buttermilk Scones with Raspberry Filling
This recipe hails from a former public tv personality, Father Dominic, of Breaking Bread. We saw the episode with these scones, and my husband had to try them. In short, he thought they were fabulous. Personally, I'd use seedless preserves, but if you like the seeds, by all means, go ahead and use regular preserves. Or use strawberry preserves. Either way, these will taste wonderful.
2 cups all purpose flour
1/4 cup unsweetened cocoa powder
1/2 cup granulated sugar
1 Tbsp. baking powder
1/8 tsp. baking soda
1/4 tsp. salt
1/2 cup (1 stick) butter, cold, cut into small pieces
1/3 cup milk chocolate morsels, chopped fine
1/2 cup buttermilk
1 egg, beaten
1/2 cup raspberry preserves
Preheat the oven to 400F.
Sift flour, cocoa powder, sugar, baking powder, baking soda, and salt into a large bowl; stir to mix well. Using a pastry blender or two knives, cut butter into flour mixture until mixture resembles coarse crumbs. Stir in finely chopped chocolate. Combine buttermilk and egg in a small bowl; whisk until well blended. Pour into flour mixture; stir with a wooden spoon until just moistened. Do not overmix.
Turn out dough onto a lightly floured surface ; knead gently 8 or 10 strokes. Divide dough in half. On a lightly floured surface, pat each piece into a flattened 8-inch round. Place one round on a lightly greased baking sheet or jelly-roll pan. Spread preserves on top of the round. Place the second round on top of the preserves. Using a large knife or metal spatula, cut into 8 wedges, wiping the knife after each cut.
Bake 15-20 minutes, or until firm on the edges but still slightly soft in the middle. Let cool on a wire rack, then cut wedges apart before serving.
Tuesday, November 14, 2006
Vermicelli Pudding
I saw this Indian-inspired recipe on The Saturday Early Show's Chef on a Shoestring (CBS) quite a while ago. This dessert is not overly sweet, but it does have an interesting texture combination of the pasta and nuts. I preferred it warm, but it can be eaten warm, room temperature, or cold. If you reheat it (if there's any left), just add a little milk or cream.
1 Tbsp. ghee or butter
3 Tbsp. mixed nuts, chopped (I just used cashews)
1 1/4 to 1 1/2 cups (5 oz) vermicelli, broken into short lengths
1 1/4 cups milk
2/3 cup canned evaporated milk
5 Tbsp. white sugar
Heat the ghee or butter in a heavy saucepan and fry 2 tablespoons of the nuts for a few minutes, until golden brown. Add the vermicelli and fry until it begins to turn golden, taking care not to over-brown it. Add both the milks and the sugar. Bring to a boil and reduce the heat, scraping down the sides of the pan to return the creamy
residue into the milk. Simmer for 12-15 minutes until the vermicelli is soft. Remove from the heat and pour into individual serving bowls. Sprinkle with the mixed nuts. Allow to cool thoroughly then chill in the refrigerator if serving cold, or you can serve it warm.
Thursday, November 09, 2006
Okra Pancakes
This is another Martha recipe. While some might not be a big fan of okra, I (and most of my family) really like it. I would bet that you could use frozen okra for this recipe, but be sure to slice it thinly (no bigger than 1/4 inch thick rounds) and use the non-breaded kind. Also, I didn't have any peanut oil, but olive oil worked well for me. These are an excellent side dish, especially in the summer when they are in season.
1/2 cup stone-ground white cornmeal
1/2 cup all-purpose flour
1 1/2 tsp. coarse salt, plus more for serving
1 tsp. baking powder
1 large egg, lightly beaten
1/2 cup water
1/2 tsp. freshly ground pepper
1/2 tsp. coarse salt
1/2 cup finely chopped onion (~1 small onion)
2 cups thinly sliced okra (~ 1 pound)
Peanut (or olive) oil for frying
In a medium bowl, combine the cornmeal, flour, 1 1/2 teaspoons salt, and the baking powder. Whisk to combine. In a second bowl, whisk together the egg and water. Stir the egg mixture into the dry ingredients. It should resemble the texture of loose mashed potatoes; if not, add a little more water.
In a small bowl, combine the onion and okra. Season with remaining salt and pepper. Toss to combine, and fold into the batter.
In a cast-iron skillet, heat 1/2 to 1 inch of oil to 340F. Working in batches so as not to crowd the pan, spoon the batter by heaping teaspoons into the hot oil. Fry until golden brown, 1 to 2 minutes per side. Use a slotted spoon to remove from oil. Drain on a wire rack or crumpled paper towels. Sprinkle with salt, and serve immediately.
Tuesday, November 07, 2006
Blogging By Mail is back!
If you're interested, head on over to Dispensing Happiness and see the details. Then, email Stephanie with your info and have fun! I thoroughly enjoyed the last round of BBM, and I'm greatly looking forward to this one, too! So, what are you waiting for? Sign up now!

Thursday, November 02, 2006
Sugar Cookies
These simple cookies are great plain, decorated with icing or sugar, or used in the Ravioli Cookies.
1 cup butter
1 cup sugar
1 large egg
2 tsp. baking powder
1 tsp. vanilla
2 3/4 cups flour
Preheat oven to 400F. In a large bowl, cream butter and sugar with an electric mixer. Beat in egg and vanilla. Add baking powder and flour, one cup at a time, mixing after each addition. The dough will by very stiff; blend last flour in by hand. Do not chill dough. Note: THe dough can be tinted with Icing Color. Add small amounts until desired color is reached. For chocolate cookies: Stir in 3 ounces melted, unsweetened chocolate (if dough becomes too stiff, add water, a teaspoon at a time).
Roll out dough into 1/8 inch thick. (You may need to divide the dough into 2 balls first.) Use desired cookie cutters to cut shapes from rolled dough. Place cookies onto parchment or Silpat lined baking sheets. Bake on the top rack of the oven for 6-7 minutes or until lightly browned. Serve plain or decorated as desired.
Tuesday, October 31, 2006
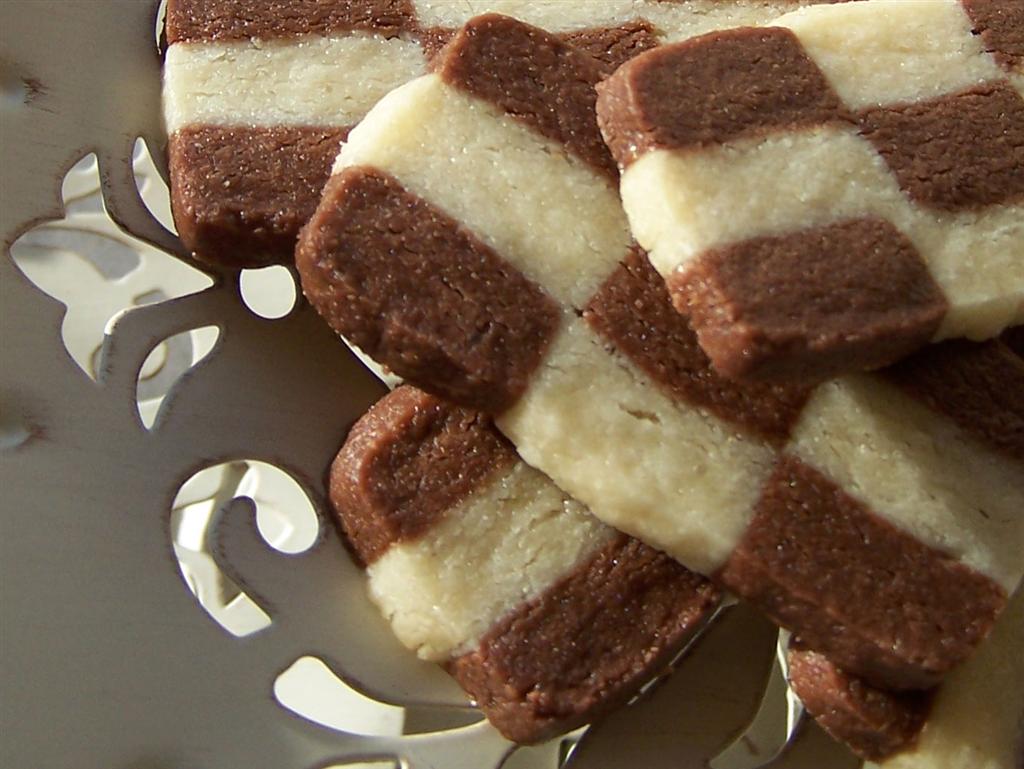
Checkerboard Cookies
I first saw these cookies on Martha Stewart's website and became intrigued. I thought they looked like a lot of trouble and stashed the idea in the back of my mind. I volunteered to make cookies for the Fall Festival at my church and decided to give these a try. Yes, indeed, they are a bit of trouble. I think if you were making several batches at once, it would be much more efficient. However, the results were rather visually appealing (though perhaps not as perfect as Martha's). I didn't have Dutch process cocoa powder, so the flavor was a bit off (according to my husband). However, I think the kids will enjoy them nonetheless.

1 cup (2 sticks) unsalted butter, softened
1/2 cup sugar
1 teaspoon vanilla extract
1/4 teaspoon lemon extract
1/4 teaspoon salt
2 1/2 cups sifted all-purpose flour
3 tablespoons Dutch-process cocoa powder
1 large egg
In the bowl of an electric mixer fitted with the paddle attachment, cream butter and sugar until well blended, 1 to 2 minutes. Add vanilla extract, lemon extract, and salt. With mixer on low speed, gradually add flour, scraping down sides of bowl.
Turn dough out onto a clean work surface; it will be loose and crumbly. Knead dough by pushing small amounts away from you with the heel of your hand for 1 to 2 minutes. Divide dough in half. Sprinkle cocoa powder over one of the halves. Knead until cocoa has been fully incorporated. (This step can be avoided if making two batches; just add cocoa to one batch and leave the other plain.)
Place each half of the kneaded dough between two sheets of plastic. Using a rolling pin, shape dough into two 7-inch squares, about 3/8 inch thick. Using a sharp knife and a ruler, slice each square into nine 3/4-inch-wide strips.
Whisk together the egg and 1 tablespoon water. Cover work surface with plastic wrap. Place three strips of dough on plastic, alternating white and chocolate strips. Brush tops and in between the strips with egg wash. Gently press strips together. Repeat, forming second and third layers, alternating colors to create a checkerboard effect. Wrap assembled log in plastic. Repeat process for second log, reversing color pattern. Refrigerate 30 minutes, or freeze 15 minutes.
Preheat oven to 350F; line a baking sheet with a silicone baking mat or parchment paper. Slice each log into 1/4-inch-thick slices; place on baking sheet. Bake until done, 10 to 12 minutes. Remove baking sheet from oven, and let cookies cool 2 minutes. Transfer cookies to a wire rack to cool completely.
Tuesday, October 24, 2006
Subscribe to:
Comments (Atom)